
Trasitions in animation
Transitions is a movement or the process or a period of changing from one state or condition to another.
My idea for unit 10 is the change in people's emotions. Emotions are a continuous cycle, a transition that doesn't end until death. There are many factors that make up emotions such as the environment and people surrounding us as well as everyday situations. I want to show how our body posture changes and our expressions transform to reflect a mood. Artists Januz Miralles, Linnea Strid and photographer Anne Leibovitz have guided and inspired me throughout this project to create my work. Both artists like to create expression and let the viewer make up their own mind about the mood and feelings it gives them. Photographer Anne Leibovitz captures many different facial and she says no image is the same. You can take the same photo twice and it will come out different.
In each class I will link my work through film, photographs and prints.
In our first lesson we used Adobe AfterEffects to create exploadng text. This is called Kinetic animation.
To do this you must open After effects and create a new composition.
set the frames to a selected time ans then create some text on the page by clicking on the text button in the tool box and dragging a sqaure on the page.
Then go to the 'Effects' meno and select 'simulation' and then select 'pixel polly' effect. change the gravity settings grid spacing and start time to your prefered times.
Next open the effcts panel and move the timeslider to 0 seconds click the keyframe button to the 'force centre' add a key frame. Then increase the time slider and move the composition across.
Add a glow effect Effect - Stylize - Glow.
Change the glow values to your prefered style e.g the intensity radius and colours.
You can also change the blurriness and how fast it burs.
To create an After effects video we downloaded 2 free 2G video clips from MitchMartinez.com. open up After effects and drag the first image into the screen and then drag it into the 'create a new composition' box. it will come up on the screen and you can adjust the size and width of the frame and crop it.
Then do the same process with the second video, you can either import it or simply drag it onto the page. match up the sizes of the video clips and then go to 'Layer ' at the top of the screen then click on 'Blending mode' and select an option e.g 'soft light' to change how the piece will look.
Once you are happy with the out come to to the top of the screen and select ' Compostion' then 'Add to render queue'. you can change the settings where the clip will save to and how you want it to render e.g as a quick time clip.
Here is where you drag the clip to create a new composition.
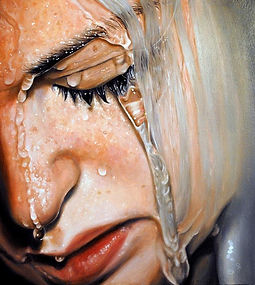
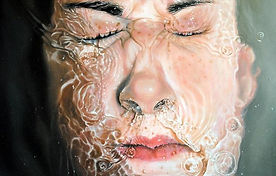
With my topic I wanted to show the changing emotion of feeling trapped. I was inspired by artist Linnea Strid who uses water in her art work. She likes the viewer to come up with their own view and feelings portrayed when the see her work. I got my subject to breathe her air out to give a sence of letting go. Below you can see the edit I did to crop and change the video and to start adding effects and change the mood of the video clip.
Here is 2 pieces of Linnea Strids water art work that have influenced me in the making of this outcome.She is inspired by human emotion. Her main inspiration was water and human emotion. The fear od dying and living, loneliness and anxiety.


In order to create my work I took the following steps. Create new composition Insert the chosen video and move the selected file in the project window into the new composition icon. Move the time indicator into the chosen place and go to edit then split layer option. Then adjust the video. Again go to edit and split layer and move the time indicator again to adjust the end of the video. Once cropped right click trim comp to work area.
In this clip I am working on different styles and blending modes to create the mood i want to portray for the video.
Here are a few outcomes i chose to present for my final pieces to portray different emotions.
The first clip suggesting a sharpe look it is hard to see her clearly like she is transforming. The second clip creating more of a warm relaxing feeling yet the transition/change to her struggling and fading away due to her toning in with the effect. The third clip has dull toned down colours, you can focus on her as she stands out.
EVALUATION
Once I understood what was needed from us for this unit I was able to plan out what I had to do and how to link my work together in every subject.The aim of my idea was to show the Transition of emotion and how it is a constant change in the face and also the body. I believe I have represented this through all 3 different subject areas.I experimented and created outcomes for each subject area and was able to link my work together.
PRINTING - I enjoyed working with different forms of print and after experimenting with all 3 methods I found that mono printing was the best method for me. The ink transferring onto the paper once pressed on gave a faint shadow type of appearance to help with my outcomes. It gave the piece a certain look and mood. I researched into 3 printing artists which helped to inspire my outcomes with over laying colours and use of colour choice. I had heard of these artists previously and some I had never come across until I studied printing as a topic. They inspired me with my outcomes, the main artist I focuses on is called Luisa Uribe.My method for my small outcome word well and it wasn't complex and is easily repeatable. In college I carried out the practical work and at home I wrote the methods for them so I could keep track each week and also took notes which was very useful.If I had more time I would of liked to work more into my idea for this section so I could experiment more.
ANIMATION - I learnt new skills on the Mac's and being taught how to use after effects. I became really motivated in this class after seeing what I could make on Aftereffects. This programme became the software I used to create my outcomes. I came up with many ideas and expanded on 2 of those in my sketch book along with a mind map. I understood what the different programmes were like and the achievements I was able to get with each one. The artist research was effective and helped to guide me along the way. I have many different artists for the unit as a whole which can be found in my sketch book but for Animation unfocused on artist Linnea Strid. I experimented enough with my outcomes and record my steps along the way and produced 3 short clips in the time we had. If I was to do this project again I would try and create a longer clip with more effects and distortion. I learnt many new skills in this class.
PHOTOGRAPHY - I found this section not too complicated to show my idea with. We were taught how to use the photography class room and how every piece of equipment worked. I used photoshop for my experimental work and my final outcomes. I was very happy with the 13 edited photographs I had produced. I researched a lot into artists who had a similar passion to me with their ideas and found a connection between artist Linnea Strid, Januz Miralles and photographer Anne Liebovitz. I over came problems by looking up how to fix them e.g not being able to rub out something on photoshop. After researching and asking questions it turned out I was not clicking on the correct layer to edit.